The perfect material for custom greenhouse
projects and more! Whether you're ready to build a
custom greenhouse, re-cover an aging greenhouse or rescue an old
carport and turn it into a sunroom, the possibilities are endless
with Solexx flexible, twin-wall greenhouse covering. Solexx is easy
to install while providing the best insulation possible. Solexx tops
the charts for greenhouse covering options due to its superior
performance which means high heat retention and less temperature
fluctuation for your plants and lower heating bills for you!
Solexx™ Greenhouse
Panels
•Strong and shatter proof greenhouse covering protects against wind
and snow.
•Solexx™ greenhouse panels diffuse the light throughout the
greenhouse for optimal plant growth.
•The double-walled insulated greenhouse material helps hold in the
heat.
•10-year warranty
Installation and Ordering Tips:
Solexx is flexible and can wrap around peaks
and corners for a watertight seal
Solexx scores and cut easily - no power saw
required
Installs both horizontally and vertically
(unlike polycarbonate) for less waste
Available in pre-cut panels or custom length
rolls up to 900' long (fewer seams means better insulation and
less work)
Two thicknesses: Use 3.5mm for almost all
applications. Choose 5mm for high altitude, heavy snow areas
Join panels together with optional H-Channel
or, simply overlap the panels (panels are an extra 1" for
overlapping)
For optimum support, set studs or trusses 2'
apart on center
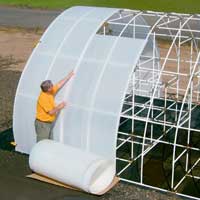
Installing
Solexx Roll Greenhouse Covering and Paneling
Solexx greenhouse paneling is a very strong, yet flexible,
twin-wall polyethylene covering, making it easy to install and cost
effective to ship. Due to its translucent characteristics it
diffuses light exceptionally well. Creating an environment with no
shaded areas or hot spots and with an "R" value of 2.1R for 3.5mm
paneling (2.3R for the 5mm paneling), it makes an ideal covering for
greenhouses, end walls, light panels, car ports, etc.....the
possibilities are endless. This product may have slight
imperfections, or blemishes, but they are only cosmetic and will not
affect the quality or performance of the material.
1.
UNROLLING: If the precut panel or length off of the roll is
too curved for easy installation, try straightening it out by laying
it out flat in a warm environment. Also, if the roll/panel has been
in storage for a period of time, it may have developed a slight
"yellow" tint from the UV inhibitor. Exposure to direct sunlight
should quickly clear this up.
2. TEMPERATURE: Install Solexx
paneling when the temperature is near the mean (yearly average)
temperature for your area to allow for expansion and contraction. If
this is not possible, put the panels in a heated area that is near
the mean temperature for your area. When ready to put the panel on
the structure, take the panel from this area and attach it to the
structure. Solexx will expand and contract with the temperature
changes. By installing the panel at your mean temperature, the panel
is in the middle of its expansion and contraction range.
3. PREPARATION: Solexx has the best
insulation qualities of any product on the market, however, in order
to achieve the R-Values; the ends of flutes must be filled with a ¼"
bead of clear 100% silicone caulking prior to installation or after
trimming an already attached panel. This traps the air inside the
flutes. Unless you need to cut or trim the panels after
installation, be sure the bottoms of the panels are caulked prior to
installing as it is very difficult to point a caulking gun up ½"
from the ground. The video below explains how to caulk the panels.
4. SPACING: We
recommend that the framing (trusses) that will support your Solexx
be placed 16" - 24" on
center. If applying to a greenhouse frame with 4' or 6' centers,
cross bracing is recommended to prevent sagging between the bows.
Ask us about cabling over the bows to prevent expansion sagging.
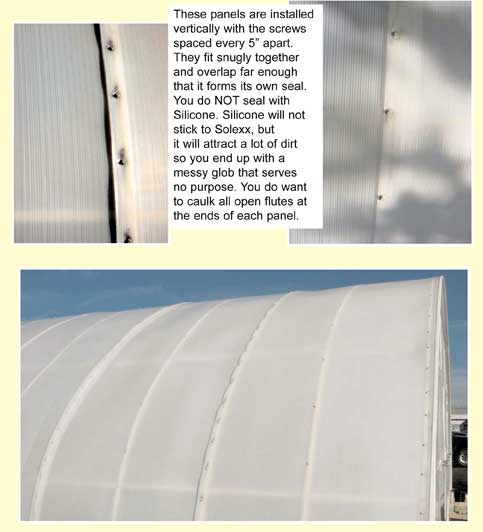
5. INSTALLING: Solexx paneling can
be applied with the flutes running in either direction on your
structure.
Applying your Solexx paneling so that the flutes run perpendicular
to the framing adds to the strength of your structure but it can
also be applied in the same direction as the framing. If you are
covering a plastic or a wood structure, attach with our 1" screws
with neoprene washers to prevent water from getting into the flutes.
Our ¾" self-tapping screws are for installing your Solexx paneling
onto metal framing. Either way, no pre-drilling of the paneling is
needed. We suggest placing the screws about 6" apart on the
stringers where it is overlapped or on the perimeter of the wall or
roof structure. Be careful not to over-torque the screws, or you may
crush the paneling. The washers should just slightly dimple the
panel.
6. CUTTING: Except where your panel
ends at ground level, it is helpful to attach the panel to your
structure
first, and then use a sharp, thin utility knife to follow the frame
as a cutting guide. It works well to cut the panel with two passes
of the knife. On the first pass, use light pressure to score the
panel and set the path the knife will follow for the second pass.
The second pass should be done with more pressure to cut through the
panel, while making sure the knife is following the score line of
the first pass.
7. U-TRIM: Caulking the ends of the flutes as described above
will also prevent insects and moisture from intruding into the
flutes. For cosmetic enhancement you may then slide a U-trim piece
over the end of the panel for a permanent cap. Secure U-trim with
small screws by poking a small starter hole in one side of it with
an ice pick or small nail. Then insert screw through one side of the
U-trim into the Solexx paneling. Place each screw approx. one foot
apart. Put caulking in all the holes you created to stop water
penetration. Normally the screws are installed from the under side
of the panel or the side facing the center of the structure you are
paneling.
8. H-CHANNEL: Panels can be joined
together using H-Channel or overlapped on 4' or 6' centers.
H-channel is most effective when used where the sides of the panel
have no structure behind them to screw to. If using H-Channel attach
one panel to your frame while leaving about 1/8" gap in between that
panel and the next one you are attaching. This leaves enough space
for you to slide the H-channel into
place. If you need a little more room for the H-channel, you
can always trim the panel a little. Keep the screws approx. 1" from
each side of the H-Channel. Do not screw into the H-channel.
**Do not use H-channels on a roof, unless it is one continuous
H-channel running from side-to-side. No H-channel clips on a roof.
If H-channel is difficult to slide on, try spraying the grooves of
the H-channel and the edges of the panels with a little WD-40, Pam
or try rubbing a dry bar of soap on the edges or liquid soap on the
edges of the panels and tap on the end of the H-channel with a
rubber mallet.
9. SQUARING: Do not use the panels
to square your structure. Solexx™ rolls may not be perfectly square.
10. BENDING PANELS: It's not
necessary to cut Solexx™ when installing over roof peaks or around
corners. You can score the panel using a straight edge and a blunt
tipped object such as a Phillips screw driver, (be careful not to
cut the panel) and then fold the panel along the scored line.
Solexx™ paneling can be scored in either direction, either with the
flutes or across the flutes.
11. CLEANING: Wipe down Solexx™
with soap and water once a year for maximum efficiency of light
transmission. Solexx™ is almost 100% inert. You could store
hydrochloric acid in a container of Solexx™ and it would not damage
the paneling.
For additional questions, please call our
support line at 1-888-966-7877
Use Galvanized Screws with Neoprene Washers
Galvanized screws with neoprene washers provide secure
panel attachment. Attach panels to wood and PVC using 1" white
galvanized screws (available in bags of 60, 100, and 500). For securing
the panels onto a metal frame, use 3/4" self-drilling screws (available
in bags of 60).
Why Solexx
Solexx greenhouse covering surpasses other covering choices in
insulation, light quality and longevity. Save money year after year
with healthier plants, lower energy bills and a greenhouse that
lasts and lasts.
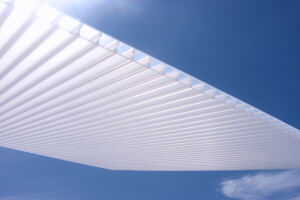
Superior
Light Diffusion Solexx is White For A Reason — it produces an even
diffuse light proven to accelerate plant growth by 30%. The light
glows evenly reaching into every corner of the greenhouse. More
light for photosynthesis means more robust growth.
Undeniable Durability
Solexx offers a 10 year warranty with an even longer life
expectancy. It withstands snow, wind, and hail and won’t fade or
yellow over time. Best of all it requires very little maintenance.
Should you need to replace the Solexx paneling at some time, the
panels are readily available and easy to replace.
Most Economical to Heat
Solexx provides superior insulation to hold in the warmth and keep
your heating costs low. Plants thrive while customers save on energy
costs. The chart below outlines the heating costs using different
types of greenhouse coverings. Solexx has one of the highest R
factors of 2.1R on the market, so it holds in the heat better than
the competition saving you hundreds or thousands of dollars over
other greenhouse coverings.
Comparison of annual heating costs with various Greenhouse
Coverings using Denver, Colorado as the greenhouse location. The 8'
x 12' greenhouse is kept at a minimum temperature of 45 degrees all
year using natural gas at $2 per therm as the heat source. Data was
compiled from the
USDA Virtual Grower software.
As you can see from the chart, Solexx pays for itself in a few
short years over the other greenhouse coverings. Keep in mind that
these heating costs are for year round heating. A majority of the
heating costs occur during December and January (the coldest
months). So, to save money, you can start seeds indoors to delay
heating the greenhouse during the coldest month.
Now you can have the finest greenhouse available at a price you can afford!
Happy Gardening...
Have FUN and enjoy
exploring our greenhouse website!
Copyright 2019, All Rights Reserved Including Page and Website "Look & Feel"

 1.
UNROLLING:
1.
UNROLLING: 

 Superior
Light Diffusion
Superior
Light Diffusion

