|
INSTALLATION AND OPERATING INSTRUCTIONS
INSTALLATION AND OPERATING
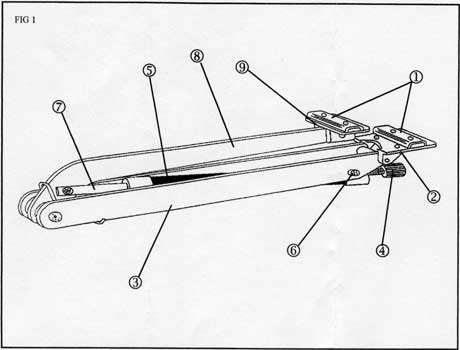
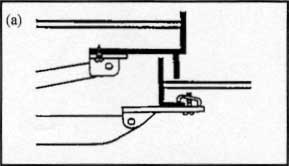
INSTRUCTIONS PARTS LIST (See Fig. 1)
1. Gripping Channels 2. Gripper 3. Lower Arms 4. Adjusting Screw 5.
Cylinder 6. Suds
7. Piston Rod 8. Upper Arm
9. Window Bracket
BEFORE FITTING
Remove existing window casement stay and fittings from window and
frame. Ensure that the greenhouse window opens freely and is not
obstructed. If necessary lubricate moving parts with thin oil.
Loosely fit adjusting screw (4) into end of cylinder. DO NOT tighten
at this stage. Assemble the cylinder to bracket by feeding the
piston rod (7) into the end of the cylinder (5), pushing firmly into
place, and secure to lower arms (3) by means of threaded studs (6)
provided. It may be easier to do this if the arms are slightly open.
Loosely fit the gripping channels (1) to the gripper (2) and window
bracket (9) using the screws supplied. Again it may be easier to do
this if the arms are opened slightly by turning the adjusting screw
(4) clockwise.
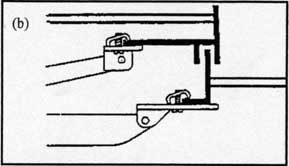
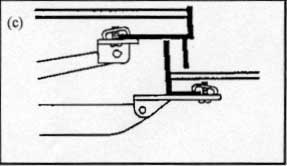
1) FIT UPPER ARM TO WINDOW
Secure window bracket centrally to window by sliding gripping
channel between bottom rail and glass and position screws as close
to edge of bottom rail as possible. Tighten screws sufficiently to
hold in place.
2) FIT LOWER ARMS TO SILL BAR
1. Turn adjusting screw anti-clockwise until the arms close. It may
be necessary to allow the cylinder to cool.
2. Attach gripper to sill bar by sliding gripping channel over sill
bar and position screws as close to edge of sill bar as possible.
Tighten screws sufficiently to hold in place.
3. With the window closed the upper arm (8) should be positioned
closely in line with but not touching the glass. To achieve this it
may be necessary to reposition the gripping channel in the adjusting
slots in the window bracket and/or alter the position of the
gripping channel on the gripper by using another set of holes.
4. When adjustments are complete tighten both gripping channels
ensuring the upper arm is central to the lower arms.
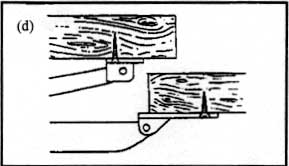
When fitting to wooden greenhouses the window bracket and the
gripper can be screwed directly on to the framework using No. 8
round head wood screws.
ADJUSTMENT
After allowing the autovent cylinder to reach the temperature at
which you require the window to start opening hold the window
slightly open and firmly turn the adjusting screw in the direction
of the 'LO' arrow (clockwise) until the unit begins to support the
window without assistance. Any rise in greenhouse temperature will
now cause the window to open wider. Further adjustment may be
necessary in which case repeat the process ensuring the weight of
the window is taken off the unit as before.
By fuming the adjusting screw in the direction of the `LO' arrow
(clockwise) the window starts opening at a lower temperature. If the
adjusting screw is turned in the direction of the `HI' arrow
(anti-clockwise) the window will not open until a higher temperature
is reached.
PLEASE NOTE: ADJUSTMENT IS MADE EASIER IF THE WINDOW IS PUSHED
SLIGHTLY OPEN.
As the cylinder is so positioned to also allow it to sense the
effects of any chilling air from outside it will automatically react
to this and adjust the window accordingly, giving added protection
to your plants.
WINTER USAGE: The solar vent openers use a waxy
proprietary substance in the vent cylinder. When it is warm, the
material expands and contracts to move the vent arm. If it is to
cold, the cylinder will not move and in some cases freezing and
thawing can cause damage to the unit.
PLEASE NOTE
Do not heat to more than 50C (122F)
Do not apply excessive loads by locking or covering window
Do not attempt to dismantle the cylinder
TECHNICAL INFORMATION
Opening temperature range adjustable between 15C and 25C (59F and
77F).
Will lift 7kg, i.e. a window weighing up to 14kg (glass area not
exceeding 0.75 sq. m in aluminum frame).
MAINTENANCE
Lubricate all moving parts after fitting and each subsequent spring
and autumn using a light oil. Use grease or petroleum jelly for the
piston rod. After long periods of low temperatures and at least once
a year take the weight of the window with one hand and move the
adjusting screw clockwise three or four toms then move it
anti-clockwise to its original position.
GUARANTEE
Provided the autovent has been correctly fitted in accordance with
these instructions it carries a one year guarantee from date of
purchase. Should it fail to operate during this period please return
either the complete unit or defective part to the address shown on
these instructions. |